Vegan Flu Shots — 2015 update

Last year, I wrote a guide to getting a vegan flu shot (in the US), covering the science, and some of the reasons why flu shots, and recombinant flu shots in particular, are a good idea.

The science hasn’t changed much since then, but vegan flu shots are a bit easier to find. This update covers getting FluBlok, the recombinant flu vaccine approved in the US, in 2015.

What is FluBlok?

FluBlok is a flu vaccine produced using recombinant genetic techniques to grow virus with coat proteins from the flu virus in cultured insect cells, instead of in chicken eggs. This produces a flu vaccine without animal ingredients, compared to conventional flu shots, which take about an egg per dose of vaccine to produce. The science is covered in a bit more detail last year’s guide.

Flublok Shot

FluBlok is approved in the US for adults over 18 years old. Only conventional flu shots are currently approved for children.

How to find FluBlok

Most major pharmacy chains (eg. Walgreens) still do not carry FluBlok. Here are some places you can find FluBlok this year:

Target Pharmacies – The biggest change from last year may be that Target pharmacies now carry FluBlok. No appointment necessary, but it may be wise to call ahead. I had no trouble getting a FluBlok flu shot at a Target Pharmacy, but they indicated that they only had a few doses left. They take insurance, otherwise the vaccine costs around $30.

Passport Health Clinics – Passport Health offers FluBlok by appointment, also for around $30. I got a FluBlok flu shot at Passport Health last year, and this is described in last year’s article. (SF residents: Passport Health has moved to Laurel Heights since last year.)

Some clinics and smaller pharmacies may carry FluBlok. You can use HealthMap Vaccine Finder to find pharmacies that carry FluBlok. I recommend calling and asking though, as some clinics that are marked as carrying it may be out of stock, and some data may be entered incorrectly. (For instance, Pharmaca in San Francisco is marked as carrying recombinant vaccines, but I’ve contacted them twice, and they explained that their supplier does not provide FluBlok, so they do not carry it.)

Asking for FluBlok

Even pharmacies that carry FluBlok may not know it by that name. If the pharmacy you contact hasn’t heard of Flublok, try asking for the “recombinant” or “egg-free” vaccine. If you’re not sure, you can always ask your pharmacist what the manufacturer of their vaccine options is.

You may be asked multiple times if you have an egg allergy, since that is the common reason for requesting FluBlok (or the “egg-free” flu shot, as it is often referred to). You can answer truthfully, even if they ask repeatedly. They are very likely simply trying to make sure you filled out the paperwork correctly, and that you did not misunderstand the form. They are probably not trying to pressure you out of that vaccine type, even if it may seem that way.

(I was asked if I ate eggs, “even in cookies”, and I informed them that I did not, but that it was not due to an allergy. That seemed to be sufficient.)

As far as I’m aware, anyone can request FluBlok. Most insurance plans will cover it regardless of egg allergy status, and it’s only around $30 if you pay for it yourself.

Other alternatives

I’ve focused on FluBlok, since I think it’s an interesting technology, however Flucelvax is also a technology worth supporting. Flucelvax is another vaccine grown in vitro in cell cultures, rather than in eggs, for production. Flucelvax uses virus samples delivered from the CDC in chicken eggs, but does not use eggs in its manufacturing process, so the process has a tiny, but nonzero egg footprint.

Moving medicine forward

A lot of medicine is not entirely vegan. I do not recommend avoiding medicine, especially medicine with serious public health implications such as vaccines, regardless of animal product content. For instance, I recommend conventional flu shots when recombinant flu shots are not available (including for children, for whom alternatives are not yet approved).

However sometimes we have the opportunity to help push medicine forward — toward biotechnology and away from animal products. Flu shots are currently such an opportunity, and vegans should embrace and advocate for recombinant flu shots.

In addition to reducing animal use, these technologies could overcome weaknesses in the conventional egg-based process — vulnerability to changes in egg supply, long delay to ramp up production, slow response to virus mutation, inability to respond quickly to an outbreak, and losing vaccine efficacy in “reassortment” process that adapts the virus to growing in eggs.

Recombinant flu shots also demonstrate why I would like vegans to be open to biotechnology. Recombinant genetic techniques gave us insulin for diabetics without needing to take it from slaughtered animals. Current research projects may give us DHA (an omega-3 fatty acid not found in plants) in canola oil, B12 in plant foods, and even dairy made from yeast. Opposing biotechnology and delaying these projects could do real harm to animals.

One of the ways that we will reduce our use of animals is by using biotechnology to replace animal products in medicine and food. We should be open to this technology as a community, and should support biotech projects that reduce animal use.

Homemade Vegan Butter: An update

Vegan Butter

I’ve posted previously about making vegan butter from Mattie’s excellent recipe at veganbaking.net. Since my previous post, I’ve made butter a few more times, and made a few small changes.

The Vegan Baking recipe

Mattie’s butter recipe at Vegan Baking is the best vegan butter recipe that I’ve come across. I love how it replicates the chemistry of dairy butter, rather than simply imitating its flavors. It uses curdled soy milk solids as a flavor base, and uses a mix of coconut oil (for solid / saturated fat) and vegetable oil as the fat.

This recipe captures the flavor and texture of butter much more realistically than any butter alternative that I’ve tried. It has a complex flavor, and could stand up to high cuisine in a way that Earth Balance could not. This recipe is still the basis for the vegan butter we’ll be making, with a few small adjustments.

Choosing Soy Milk

After making this a few times, I noticed that sometimes this would make incredible butter, whereas other times it was more pedestrian. I also noticed that sometimes the soy milk curdles in an obvious way, and other times it only curdles subtly. This led me to realize the importance of the choice of soy milk to use for making butter.

There are essentially two types of soy milk that I buy, or that I’ve seen in stores. There is general-purpose soy milk, which is usually fortified (extra calcium, vitamin B12, and usually vitamin D), and has stabilizers, such as carrageenan and xanthan gum, which keeps it from curdling in coffee, for instance. The alternative is basic soy milk, with only soybeans and water as ingredients.

In general, I think fortified / stabilized soy milk is a better choice nutritionally, since calcium, D and B12 are important in vegan diets. However for butter, as well as baked goods that require curdling soy milk, you want the basic soy beans and water style soy milk (such as this). You’ll also want the plain, unsweetened / non-vanilla kind, to avoid flavoring your butter. Since I use both types for different purposes, I usually have two types of milk at home: everyday-use fortified soy milk, and basic soy milk for making butter, yogurt, baking.

Curdling is important in giving vegan butter characteristic butter flavors, so choose a soy milk that curdles.

Vinegar

I’ve also found the choice of vinegar to be important in making vegan butter. The Vegan Baking recipe originally called for apple cider vinegar, and calls for a mix of apple cider vinegar and coconut vinegar, which I have yet to find in a store.

The main issue I had with the Vegan Baking recipe is the strength of the apple cider vinegar taste. Apple cider vinegar adds a sour fruity note to the butter, which contributes an important buttery flavor. However it is also a very strong flavor, and using apple cider vinegar as the only vinegar in this recipe overwhelms the butter’s subtle flavors.

The Vegan Baking article discusses this, and suggests a mix of coconut vinegar and apple cider vinegar if apple cider vinegar is too strong a taste. Since coconut vinegar is a rather unusual ingredient, I recommend mixing apple cider vinegar with something most people already have in their cupboard: white vinegar. I found that combining apple cider vinegar and white vinegar in a 1:3 ratio works very well.

Scale

The original recipe makes only a cup of butter (two regular-size sticks), which isn’t a lot of butter to make in a batch, and such a small amount of butter does not blend well in a 64oz vitamix container. For these reasons, I always make double batches of the recipe and freeze sticks of butter until I need them.

Recipe

Setup

Prepare a level place in your freezer for your butter to cool. Chill the mold you’ll be using in the freezer, so that the butter freezes quickly. Heat coconut oil until it’s liquid, but not much warmer than room temperature.

Prepare butter solids

3/4 cup plain soy milk (unsweetened, unflavored, and without stabilizers; see above)
1/2 tsp apple cider vinegar
1 1/2 tsp white vinegar
3/4 tsp salt

Whisk ingredients and set aside for 10 minutes to curdle.

Prepare the oil blend

1 1/4 cups + 2 tsp lukewarm refined coconut oil
2 tbsp canola oil
4 1/2 tsp soy lecithin granules (or 2 tsp liquid soy lecithin)
1/2 tsp xanthan gum

Measure these into the blender that you’ll be using to blend. (Don’t blend yet, or you may scatter the lecithin granules, making them hard to mix in.)

Mix, blend and refrigerate

Add the butter solids to the oil mix in the blender, and blend.

Once well-blended, pour into a mold. I use an Allforhome mold, which makes 1/4 cup sticks of butter (half the size of normal butter sticks).

Put the mold in the freezer until the butter is frozen solid (a few hours).

Serve

Keep the butter in the freezer until ready to use, then move it to the fridge. If you’re able, keep it out at room temperature before using it to spread on bread. This yields a nice spreadable texture.

Final thoughts

Vegan butter is a great staple to have on hand, and it’s gratifying to make something that is so much better than what is available in stores. This recipe has won the approval of our family’s baker, who is otherwise skeptical of vegan butter, which is high praise.

I’m always open to trying different variations or improving a recipe, but to my palate, this butter is very nearly perfect.

Goma-ae

Goma-ae is my latest culinary love. It’s a sweet Japanese preparation of spinach with a sesame dressing sauce. I first encountered goma-ae at Shizen, San Francisco’s new vegan sushi restaurant (which I highly recommend), and it was an instant favorite.

Spinach is incredibly nutrient-dense, especially after cooking down. Almost anyone’s diet can be improved by adding cooked spinach, so this is a great addition to any home cook’s repertoire. I haven’t tried this dish with children, but my hope is that it would be kid friendly.

Goma-ae is fairly straightforward to prepare. The only real trick is not overcooking the spinach. Spinach cooks rapidly in boiling water, so you have to be quick, and then cool the spinach down in cool water to stop it from cooking further once you remove it.

The use of tahini here is a bit non-traditional. Traditional recipes use a larger amount of toasted sesame seeds, and a mortar-and-pestle to grind them. This is a bit easier, and tastes delicious.

Goma-ae

Goma-ae, prepared from just over a pound (500g) of raw spinach.

Recipe

I based this on a recipe from Japan Centre. I substituted tahini for some of the sesame seeds based partly on my observation of the Shizen dish. (Also because don’t have a mortar and pestle.) I also reduced the soy sauce a bit to highlight the other flavors.

I have a difficult time getting 1 tbsp of sugar to dissolve in 3 tbsp of liquid. The original recipe calls for 2 tbsp sugar in 3.5 tbsp of liquid, and doesn’t discuss heating to dissolve it. It actually makes me wonder if that’s not a typo. :) Maybe use agave or something if you don’t want to bother with dissolving sugar.

Ingredients

  • 500 g (1 lb) fresh spinach — I used baby spinach
  • 1 Tbsp soy sauce
  • 2 Tbsp mirin
  • 1 Tbsp sugar
  • 2 Tbsp tahini
  • 2 Tbsp toasted sesame seeds
    (or toast raw sesame seeds; see below)

Yields about 2 cups. Let’s call it 4 servings.

Preparation

Spinach

Boil water in a large pot. While it’s heating up, rinse and wash the spinach.

Prepare a bowl with ice water to cool the spinach after it cooks.

To cook the spinach consistently, you’ll have to get it in and out quickly. I’ve been boiling the spinach in a steamer basket, which makes it easy to remove quickly.

Boil the spinach just until the spinach turns a deep green. For baby spinach, this takes about 30 seconds. Fully grown spinach (which I haven’t tried) is said to take about a minute.

Once the spinach is out, run it under the faucet for a few seconds to cool it down, then put it in the ice water.

I had to cook the spinach in two batches to fit it all. Once the spinach has been cooked and chilled, drain it and squeeze the water out.

If you’re using fully grown spinach, cut it into two-inch lengths.

Dressing

Dissolve the sugar into the soy sauce and mirin. I find that I have to heat the mixture up by microwaving it for 15 seconds to fully dissolve it.

Once the sugar is dissolved, add the tahini and sesame seeds.

Toasting sesame seeds (if needed)

If you need to toast sesame seeds, it’s easy to do and just takes a few minutes. I toast sesame seeds a few cups at a time.

Put them in a sauce pan over medium heat, stirring frequently, until they become fragrant. Remove from heat, and let them cool on a tray. They can overcook if you keep them in a pan, and moisture is trapped if you put them in a jar right away.

Serve

Pour the dressing over the spinach. Goma-ae is best served cold, so consider putting it in the fridge for a bit before serving.

Nutrition

Just for kicks, here’s some basic nutrition info for a 1/2 cup portion:

  • Calories: 144
  • 17g carbohydrates, 7g fat, 6g protein
    (4g fiber, 9g sugar)
  • Potassium 21%, vitamin A 234%, vitamin C 59%, calcium 12%, iron 21%

Soy Yogurt Crisis: 2015 edition

WholeSoy & Co yogurt. Image credit: WholeSoy & Co (instagram)

You’ll be missed. Image credit: WholeSoy & Co (instagram)

My most popular post on this blog to date was an early post on the great Soy Yogurt Crisis of 2013.

That situation was caused by a yogurt manufacturing plant used by WholeSoy & Co. (and likely Amande and Trader Joe’s) abruptly closed its doors without notice. This occurred after a period of consolidation in the soy yogurt market, leaving the US without a plain (non-fruit flavored) soy yogurt. Flavored yogurts are great, but are not appropriate for baking, for instance.

Now, a year after WholeSoy & Co resumed production in March 2014, WholeSoy & Co issued an announcement yesterday stating that they can’t repay the debt they accumulated during the 2013 lapse in production, and have been forced to shut down.

I’m very sorry to see WholeSoy & Co go. They were a great soy yogurt brand, and were beloved by the vegan community. I hope that someone brings a plain soy yogurt to the US market market soon to begin to fill their shoes.

It’s been a while since I’ve taken inventory of the current soy yogurt offerings. In the coming weeks, I hope to look into what soy yogurts are still out there, and if any of them can stand up to what WholeSoy & Co. offered.

Do you have a favorite soy yogurt that is still available (especially with a plain flavor)?

Cooking Lesson with Jesse Miner

Emily and I recently had a cooking lesson with Jesse Miner, a vegan personal chef based in San Francisco. I met Jesse at one of the first vegan events I went to, and it was great to reconnect with him for a cooking class.

Jesse came to our home with the ingredients we’d be cooking with, as well as equipment in case we needed it. We cooked for several hours, then had a big meal. The menu was put together by Jesse, based on our interests and culinary skill level. The lesson introduced us to several new foods, some of which were instant favorites.

Roasted Japanese Sweet Potatoes

Roasted Japanese Sweet Potato

This was a new food to us, and they’re so good! These don’t require preparation, and can be put in the oven at 350 for about an hour, and served sliced. They keep in the refrigerator once cooked, and make a great snack, so we’ve been cooking a few at a time, and eating them throughout the week.

I brought some to work in a mason jar. Depending on how much eccentricity you’re comfortable projecting, this is either a brilliant work snack, or bizarre and shameful behavior.

Spring rolls

Spring roll mid-preparation

Spring rolls are a food we enjoy at restaurants but hadn’t made ourselves. If you use store-bought baked tofu, they’re pretty straightforward to make.

Spring Rolls

Folding them is a bit challenging. You win some, you lose some.

Umeboshi Onigiri

Onigiri

These are a Japanese street food. There’s a food truck in SF that sells them, which is how we’d come across them in the past. The ones we made were filled with pickled plum (umeboshi), a favorite sushi filling of Emily’s, which we’d never cooked with.

They turned out great! As with the spring rolls, we haven’t mastered making them geometrically consistent.

Korean Lettuce Wrap

Ssambap

This was our favorite discovery of the night. Emily and I haven’t been exposed to much Korean food, and vegan Korean food can be difficult to come by. However this was amazing.

This is a lettuce wrap (ssambap) with rice, soy curls Korean barbecue (bulgogi), and a fermented hot pepper sauce (ssamjang).

This wrap has so many flavors, and a few of them were new to me. I’d bought some soy curls ages ago, but I’d never cooked with them. Soy curls are a bit intimidating looking if you’ve never had them, since they are packaged dry, and don’t really look like anything before you rehydrate them.

The bulgogi marinade was delicious, and the ssamjang sauce, based on gochujang, a fermented pepper paste, is a very unique flavor that I was craving the rest of the week.

I plan on writing more about vegan Korean food in another post. However suffice it to say that we loved this dish, and made it twice more that week (until we ran out of soy curls).

Haupia

For dessert, we made haupia, a sweet Hawaiian dish. Haupia is made with coconut milk and corn starch, and results in a gel-like consistency. It’s a bit hard to describe, but it’s a unique dessert that we hadn’t come across on our recent trip to Hawaii, so we were happy to try some.

Haupia

And more!

Other foods we cooked included a peanut sauce and a Vietnamese hoisin dipping sauce, a cole slaw using the peanut sauce, and collard green wraps using the cole slaw.

Jesse Miner cooking class - for blog - 6

The takeaway

The cooking lesson was a great experience. It was great to prepare so many foods that are very different from what we usually cook, and it was great to get outside of our comfort zone culinarily.

Cooking lessons are a fun way to expand your culinary repertoire, and participate in the catering and chef businesses that are the heart and soul of the vegan food movement. I had a great time, and I hope to take more cooking lessons in the future.

Tempeh Buffalo Wings

This is the first recipe I made with Frank’s Red Hot, and I’ve gone through bottles of the stuff on this recipe alone. It tastes like junk food without being particularly unhealthy, and is a fun way to prepare tempeh.

Tempeh Wings

I got this recipe from Clean Green Simple, which says you can also make this with cauliflower. I find that tempeh works well, and I like to have a protein (or high-lysine food, if you want to get technical) with every meal, so I haven’t tried the cauliflower variety.

I use Rhizocali Tempeh, an Oakland-made tempeh that can be found at Rainbow. It’s distributed frozen, and keeps indefinitely in the freezer. I buy a bunch of it at a time, so that I always have protein on hand.

I’m using use Frank’s Red Hot original sauce, which contains just peppers, vinegar, salt and garlic powder. They also make a buffalo wing sauce which might also be vegan, but it has “natural butter type flavor” as an ingredient, so who knows what that means.

I make this recipe with less sauce and oil than the Clean Green Simple version. If you’re serving it in appetizer portions, this may not matter, but I usually eat this as an entree, split between two people. I make this pretty frequently, so reducing the oil makes it more tenable as a frequent entree.

Preparation

Cut the tempeh into roughly french fry shaped pieces.

tempeh wings - 01

Coat the tempeh pieces in the batter, and put the battered pieces onto a non-stick baking sheet. I’ve been using a Silpat non-stick baking mat for these, although an oiled pan may also work. Let excess batter drip off so that it doesn’t form a puddle under the tempeh on the baking sheet.

tempeh wings - 02

I find I have to go back and touch up the parts of the tempeh that I was holding, since they are otherwise missing batter.

tempeh wings - 03

Bake at 350°F for 15 minutes, then brush them with hot sauce and oil, and bake for another 5 minutes. When brushing, I try to move them and get some of the hot sauce under them, so that the bottom isn’t too dry.

tempeh wings - 05

Tempeh, baked and glazed. These are a bit overcooked. :)

Brush the tempeh with the remaining sauce, and serve immediately.

tempeh wings - 07

Tempeh wings with steamed broccoli and pastina.

Recipe

Ingredients:

  • One 8 oz package of tempeh.

Batter:

  • 1/2 cup flour
  • 1/2 cup water
  • 1 tbsp Frank’s red hot

Sauce:

  • 2 tbsp Frank’s red hot
  • 1.5 tbsp oil

Preheat the oven to 350°F. Cut the tempeh into french fry sized pieces. Mix the batter together, dip the tempeh pieces to coat, and put them on a non-stick baking sheet. Bake for 15 minutes.

Mix the hotsauce and oil together. Brush the tempeh lightly with sauce, and bake for another 5 minutes.

Coat the tempeh with the remaining sauce, and serve immediately.

Nutrition

By my count, the recipe totals 843 calories (and 48g protein). If split between two people, that’d be 421 calories (and 24g protein) per person. With broccoli and rice, it’s about 670 calories (and 31g protein). If you’re dieting, you may want to reduce the rice to 1/2 cup for a total of 562 calories.

My point with all of this is that junk food has its place, even in calorie-restricted diets. This is truly excellent junk food, and isn’t even particularly unhealthy. It just seems unhealthy, which is a quality to be respected and admired in reasonably healthy food.

Vegans don’t have enough junk food entrees. I do my part by making this almost every week.

Related work

Prior research into vegan food made with Frank’s Red Hot includes:

Vegan Flu Shots: A Guide

Flu shots can be a difficult topic in the vegan community. The internet has a lot of misinformation about vaccines in general, and flu shots in particular, which can make the topic controversial in the best of situations.

In a vegan context, the conversation is complicated by the fact that flu shots are generally made with eggs. This leads to heartache, as people have to choose between what’s best for their own and their family’s health, and being true to values that they have worked hard to live by. This can lead to motivated reasoning, where people may choose to believe that vaccines are ineffective or unsafe, rather than face the ethical dilemma.

I think it’s important to foster appreciation for science and objectivity within the vegan community, even when that means facing facts that we’re not wild about. Flu shots are a safe, effective technology, and we should seriously consider getting these vaccinations, even though they are generally not vegan.

Why should I get a flu shot?

Flu shots are associated with better performance in a broad array of health outcomes. Flu shots provide about 50% protection against getting the flu in any given year. (That is, vaccinated people get the flu half as frequently as those who are not vaccinated.) While this is less than the complete immunity given by some vaccinations, it still makes a meaningful difference to individual and community health.

The flu is particularly damaging to groups at high risk of flu complications, such as young children, the elderly, pregnant women, and people with various chronic diseases. (The CDC has a comprehensive list online.)

It’s important to recognize that vaccinations, flu and otherwise, are not a strictly personal decision. Your choice to vaccinate or not affects those you come into contact with, and society more broadly. Even if you are not at high risk of flu complications, some of those that you come into contact with may be. By getting a flu shot, you are helping to protect your community members.

Why aren’t flu shots vegan?

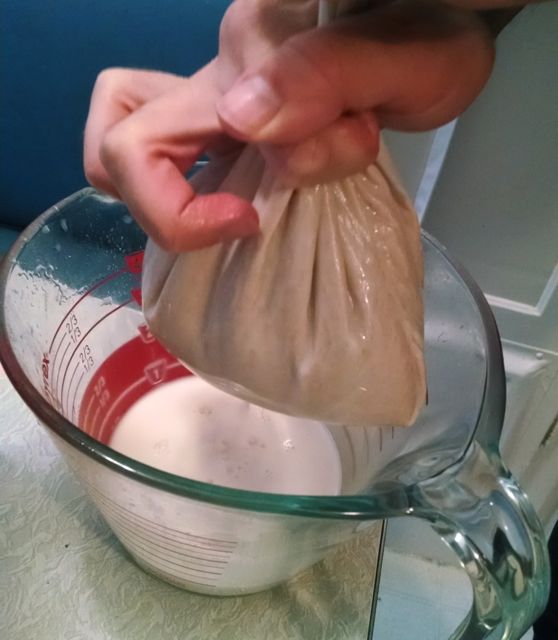
Influenza viruses only grow in animal tissue, which means that animal products are required to produce them. The standard method of producing vaccines involves growing the virus in fertilized eggs. The CDC explains:

These vaccine viruses are then injected into fertilized hen’s eggs and incubated for several days to allow the viruses to replicate. The virus-containing fluid is harvested from the eggs. For flu shots, the influenza viruses for the vaccine are then inactivated (killed), and virus antigen is purified. [1]

The final vaccine is the isolated antigen — the virus proteins that the body recognizes as foreign, and develops an immunity toward. It’s these proteins, rather than the virus itself, that results in immunity.

Are there any alternative methods of making flu shots?

Yes! This is an area where there has been a lot of recent progress, partly because the existing egg-based production system is slow and difficult to scale. Because the technology has changed so quickly, vegan communities may not be up to date on the new flu vaccines.

In 2012, a “cell-based” flu vaccine was approved. This vaccine strategy still uses eggs to grow an initial virus culture, but uses cultured animal cells to grow the the much larger amount of virus needed for vaccination. This avoids the majority of the egg use in the vaccine production process. At time of writing, there is only one cell-based flu vaccine in the US: Flucelvax. [1]

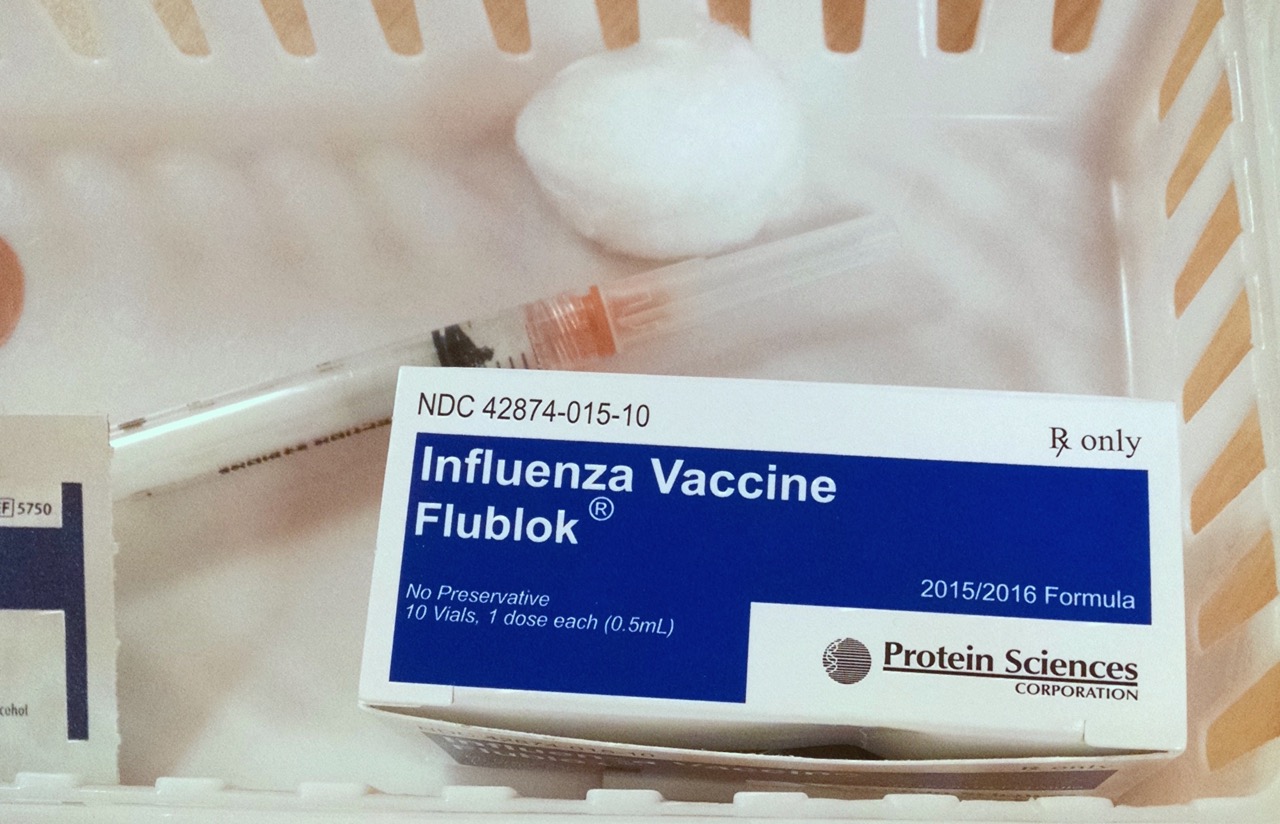
In 2013, a recombinant flu vaccine was approved. This strategy does not use eggs at all. Instead, the virus protein that triggers immune response is isolated, and genetically added to a virus that grows well in vitro on cultured insect cells. Once the virus has grown, the antigen is filtered out as usual, producing a vaccine. There is one recombinant flu vaccine approved in the US: FluBlok. Just last month, the FDA expanded its approval to cover all adults over 18 years old. (Previously it was approved for adults ages 18-49.) [1]

There continues to be a lot of research in this area, and I came across research toward plant-based recombinant flu vaccines while writing this post. It seems likely that vaccines will be more vegan-friendly in the future, in order to solve some of the technical limitations of egg-based vaccines.

So are these vegan?

Yes, more or less.

I’m comfortable calling the FluBlok vaccine vegan. I haven’t verified that its production uses no animal products, however this vaccine strategy does not require animal products fundamentally. Regardless whether it is strictly vegan, it is moving vaccines away from using eggs, which is something I’m happy to support.

I also think that Flucelvax worth supporting. Even though Flucelvax it is arguably not vegan (since it participates in the CDC process of delivering virus grown in eggs to vaccine manufacturers), the cell-based approach has different strengths and weaknesses compared to the recombinant approach, and this approach could easily lead to effective vegan vaccines in the future that could overcome potential weaknesses of the recombinant approach. (More on this below.)

I think that vegans should get flu shots, including conventional flu shots when vegan versions are not available or are not medically appropriate for them. Vaccines save lives, including the immunocompromised and those who cannot get vaccines for medical reasons. We can all help them by getting vaccinated. If you’re able to get one of the new vaccines, you can participate in moving the science forward toward vegan solutions.

Which flu shot should I get?

This information keeps changing, so check with the CDC for up to date information. I’m not a medical professional, but I’ll summarize the information I’ve found from the CDC and elsewhere, on some reasons to consider each vaccine type:

Recombinant / FluBlok

Adults 18 years of age or older can get FluBlok vaccines.

Since FluBlok contains only individually selected coating proteins from the flu vaccine, there is some concern that this vaccine strategy may be less effective. By contrast, if a vaccine contains whole virus particles (as in either conventional or cell-based vaccines), then your immune system can form antibodies to any of the virus’ proteins, rather than the selected few that recombinant vaccines contain. This may make this strategy more risky, so high-risk individuals may opt for other vaccine types.

Other considerations: This is a relatively new vaccine type, so we know the least about its efficacy. While the CDC says that many people with egg allergies tolerate even conventional vaccines, FluBlok is the only vaccine that contains no egg allergens.

I’m a reasonably healthy adult at low risk of flu complications, and I don’t have any young children in my household, so I chose this vaccine.

Cell-based / Flucelvax

Adults 18 years of age or older can get Flucelvax vaccines.

The cell-based vaccines should be equivalent to conventional vaccines, and are expected to be similarly effective. The only difference is how they are produced. They may be a good choice for adults who are at risk for flu complications, and are not comfortable with recombinant vaccines.

Cell-based vaccines are likely to have less egg allergen than conventional vaccines.

Conventional

Children from 6 months to 18 years of age should only get conventional flu shots. Children are at high risk of flu complications, and the newer flu vaccine types are not approved for them.

Conventional flu shots are a very well established and studied technology, so may also be a good choice for those at high risk for flu complications, or those who are not comfortable trying a newer type of vaccine.

How do you get a vegan flu shot?

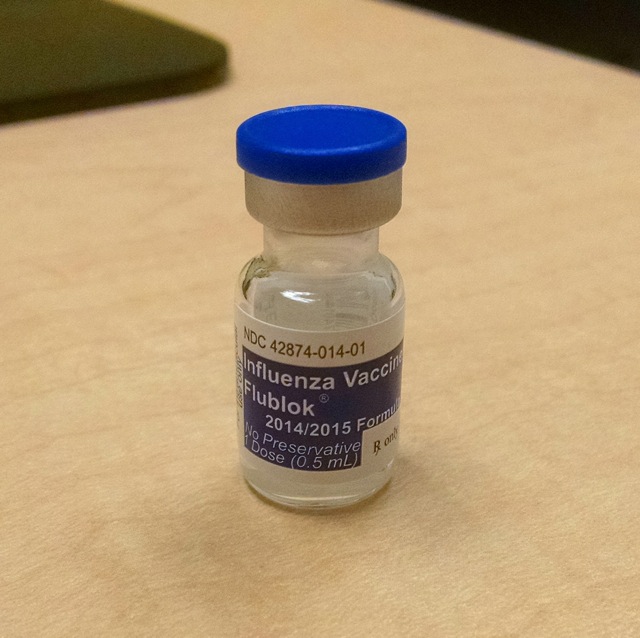
I chose to get a FluBlok vaccine this year. It’s the newest and most high-tech vaccine, and I wanted to find out how difficult it would be to get.

I’m also excited by using recombinant genetic techniques to produce vaccines as a technology. I think this technology could do a lot of good for society (faster vaccine turnaround times, more efficient scaling of vaccine production), as well as removing animals from this sphere of medicine. This would be similar to how recombinant genetics were used to produce insulin from bacteria, instead of harvesting insulin from slaughtered animals.

Finding a clinic

Update: I’ve posted an updated guide to getting a vegan flu shot in 2015. Notably, Flublok can now be found in Target Pharmacies.

One widely available source of FluBlok vaccines is Passport Health. Passport Health is a chain of vaccination clinics that specialize in travel vaccines, all of which offer FluBlok given a few days notice. San Francisco has a Passport Health clinic, so I chose that.

More recently, I’ve learned that you can find clinics that offer FluBlok (and other vaccines) online at http://vaccine.healthmap.org/. To find FluBlok, go to the Vaccine Finder site, uncheck all the vaccine types, then check only “Recombinant Flu Shot” within “Flu”. Enter your address, and it will list clinics that have registered as carrying it.

According to Vaccine Finder, there are two additional clinics that carry FluBlok in SF: Pharmaca in Cole Valley, and Recharge Medical & Day Spa in Nob Hill.

Note that Passport Health is not found by Vaccine Finder, so you’ll have to check for Passport Health locations separately for now. FluBlok’s website also has a list of clinics that offer FluBlok by state, however this list seems to be out of date, and did not contain either clinic listed in Vaccine Finder, nor any Passport Health locations, so I don’t think that list is very useful. For the time being, you’ll have to do a few searches to find the FluBlok clinic nearest you.

Making an appointment (at Passport Health)

It took about a 10-15 minute phone conversation to schedule an appointment and go through their triage to determine whether getting a flu shot was appropriate.

Note that the triage questions are generic, and seem to be the same for all flu shots. Specifically, they will ask you about egg allergies. That doesn’t mean that FluBlok contains eggs, or that they’ll give you the wrong vaccine. It’s just on their list of flu shot questions to ask.

I scheduled an appointment for a few days out, since Passport Health orders FluBlok as needed, rather than keeping it onhand.

Once you schedule an appointment, there’s an online health information form to fill out, which takes another 10-15 minutes. Just basic health and medical background.

Office visit

In SF, the Passport Health clinic is in a shared office building, in the vicinity of Fisherman’s Wharf. (Near Pier 31, if that means anything to you.)

The clinician met me in a shared reception area, and led me through a maze of identical-looking office doors to the Passport Health office. A few more questions, and we were on our way.

FluBlok

What all the fuss was about

The shot is just like any other flu shot. It makes your arm sore for a while, but otherwise is fine. The clinician let me take some pictures, and was accommodating and friendly, if slightly confused as to why I wanted photos of the vaccine bottle.

What does it cost?

The appointment, including the FluBlok vaccine, cost $30 total. That price seems to be very consistent online. I didn’t bother with submitting it to insurance, so I don’t know what the odds are of getting it covered.

Final thoughts

Medicine in general is not fully vegan. I recommend following medical advice in general, even when the medicine isn’t vegan, until vegan versions are available. For young children, this means getting conventional flu shots until the alternative preparations are approved for all age groups.

However it’s exciting to see flu shots making this transition away from egg-based production. The new high-tech immunizations could have real benefits beyond the vegan community. They take less time to develop and produce at scale, and could respond more quickly to mutations, or to new strains as they emerge.

We can participate in pushing medicine forward in this direction by opting for the newer flu shot preparations. The more people get the vaccine, the more safety data we gather, and the more trust we can have in the safety and efficacy of the new process. I’m happy to have participated in that process, in a small way.

This is also a good example of using genetic modification to solve a problem (growing virus antigens for a vaccine) that couldn’t otherwise be solved without chicken eggs. This is a great use of recombinant genetics, and is an example where the vegan community could embrace this technology.

So get a flu shot! If you’re a healthy adult, consider getting FluBlok or Flucelvax if they are available. Otherwise, just get a regular one. There’s a good chance that vegan flu shots will be widely available in the next few years.

Epilogue: Why recombinant vaccines might be more effective

Recombinant vaccines might overcome some of the limitations of the egg-based vaccine production process. To illustrate this, let’s consider the 2012-2013 flu season.

Since the flu mutates quickly, researchers have to make educated guesses about which strains will break out ahead of time, and prepare a vaccine for those strains. Sometimes they get this wrong, which is why the flu shot is only about 50% effective.

In the 2012 flu season, an interesting situation emerged where the flu vaccine was less than 50% effective (and only 9% effective in seniors), yet the scientists had guessed correctly — 90% of flu viruses were a match for the vaccine. So why wasn’t the vaccine working?

The main flu virus that season was an H3N2 strain, and H3N2 flu viruses do not grow effectively in chicken eggs. To get flu viruses to grow well in eggs, immunologists “reassort” the virus they want to target with flu virus strains they already have that are known to grow quickly in eggs. This involves infecting eggs with both viruses at the same time, and filtering out viruses that don’t have the target virus’s antigen proteins. (A more detailed discussion of this process can be found here.)

It appears that the 2012 vaccine lost its efficacy during this reassorting process, resulting in an H3N2 vaccine component that did not protect against that year’s H3N2 strain.

Either a recombinant approach (like FluBlok) or a cell-culture growth process (like Flucelvax) would not require adapting flu viruses to grow quickly in chicken eggs, and should not be vulnerable to this mode of failure. Cell-culture processes (like Flucelvax) might be the most resilient to this type of failure, since it does not require modifying wild viruses at all, unlike both recombinant vaccines and conventional “reassorted” vaccines.

Post-epilogue: This year’s vaccine

The 2014 flu vaccine is having difficulty for another reason: the wild virus has mutated, and it would take too long to manufacture a new vaccine. Faster vaccine production technologies (including recombinant or cultured production methods) may help us respond more quickly to virus mutations in the future.

References

  1. Centers for Disease Control and Prevention, How Influenza (Flu) Vaccines Are Made. (Accessed Nov 4th, 2014)
  2. Nature (News), Mutations explain poor showing of 2012 flu vaccine. (Accessed December 28th, 2014)

Fortifying homemade plant-based milk

Supplements

While homemade plant-based milks are delicious, they lack the fortifications of store-bought milks, which can be helpful to meet nutritional needs. This is especially true for families with children who are keeping to a vegan diet.

This post explores fortifying your own plant-based milks, as well as shakes and other blended beverages.

Why fortify?

Why bother fortifying plant-based milk at all? Isn’t that playing into criticism that vegan diets are nutritionally deficient?

The reason is simple. Those following conventional diets, whether they know it or not, benefit from public health infrastructure that includes fortifying foods to correct for common causes of malnutrition.

For example, consider vitamin D. Many people who work indoors are low in vitamin D, especially in the winter. Because vitamin D is something that so many people are deficient in, dairy is typically fortified with vitamin D. Vegans don’t benefit from this fortification, so we should either fortify our own food or take a D supplement to match omnivore intake.

Calcium is a less obvious fortification. While calcium is not directly added to dairy, it is typically added to cow feed to boost calcium levels in dairy. There is good evidence that vegans would have better bone health if they consumed more calcium, so it is a good idea to boost calcium where you can. (Calcium-set tofu is also a good idea for most vegans.)

Basic fortification

I recommend fortifying homemade milks and shakes with calcium and vitamin D. I recommend a pill strategy for B12, but adding B12 supplements is also reasonable. (I have only chewable B12 in the house, which have too strong a flavor for plant-based milk, but I sometimes throw one in if I’m making a shake.)

Vitamin D

I fortify plant-based milk with a vitamin D2 or vegan D3 pill, dissolved into the milk in a blender. I use an 5000 IU pill for a liter or so of almond milk, or for two glasses (~24-32 oz) of a shake. I haven’t found this to have any noticeable taste, or to add any grittiness to the milk. Just be sure to blend well, and avoid pills labeled as chewable or sublingual, as these usually have flavoring. They are fine for shakes, but are not neutral enough for milk.

There is a long history of fortifying foods with vitamin D, so I think we’re on solid ground with this fortification strategy.

Calcium

I recommend fortifying with a calcium carbonate powder. This makes it easy to experiment with different amounts of calcium, since unlike vitamin D tablets, calcium does have a taste when added to some foods.

For almond milk, I recommend adding 900 mg (the RDI is 1000 mg) per liter of almond milk. This is ~21% RDI for calcium per 8 oz serving. I’d add more, but I find the taste to be pretty strong, and the almond milk gets an unpleasant metallic taste at higher calcium doses.

For shakes, especially protein shakes where you’re already adding powder, I’m often a little more generous with calcium, with 1200 mg or so per 24oz shake (~600mg per serving). Since shakes have a less neutral flavor, it’s less noticeable. Don’t go too crazy though; exceeding 1000 mg / day of calcium may be harmful.

There is good evidence that calcium from soy milk fortified with calcium carbonate is absorbed as well as calcium from dairy (and another, and another). I’m not aware of similar studies with almond milk or shakes, but calcium carbonate is effective as a fortifying additive, at least in soy milk.

Other nutrients

Vegans absolutely need a reliable source of B12, but I recommend taking a supplement for that, rather than relying on fortified foods, since supplements are easier to dose, and since B12 deficiency has such serious consequences. See veganhealth.org for detailed recommendations on vitamin B12.

It’s also a good idea to talk to a doctor or nutritionist about any personal vitamin concerns. It may be possible to add other vitamins to blended beverages to meet your personal requirements. Be aware that some supplements (eg. DHA / EPA supplements) may have a strong taste, and may not be a good choice for blending.

Homemade almond milk!

One of the main adjustments involved in switching to a vegan diet is replacing dairy with plant-based alternatives. Almond milk was an early favorite of mine. It has a neutral taste, goes well with cereal, and makes a great hot chocolate.

However nothing compares to the creamy deliciousness of homemade almond milk. Whereas store-bought almond milk can be a bit watery and thin, homemade almond milk is thick and creamy. Homemade almond milk is one of the great discoveries I’ve made since adopting a vegan diet.

Even if you have never enjoyed almond milk, I’d encourage you to give homemade almond milk a try.

Background

Making almond milk is fairly simple. You soak almonds, blend them with water, and strain them through a nut milk bag, a fine nylon mesh bag made for this purpose.

Nut milk bags are like a sturdier, finer version of cheesecloth. You should be able to find them at any health food store, although the heavy duty kind sold online are much higher quality than the ones I’ve found in stores. I’ve been using this Ellie’s Best bag recently.

Prior art

Typical almond milk recipes simply soak almonds, blend them with water, and strain. This leaves the almonds’ outer skin intact, and mixed into the almond milk, producing a grey color. The advantage of this approach is the easier process, and the skin nutrients remain in the milk.

To make whiter almond milk, recipes may suggest blanching the almonds, which means removing the outer skin. This does produce a whiter milk, but is tedious and labor-intensive.

Oral allergies

A minor complication is that almonds are a common oral allergen. Oral allergies are a type of crossover sensitivity typically caused by an allergy to a pollen that is similar to protein found in foods. If raw almonds make your mouth itch, but you are not allergic to cooked almonds, then you may have almond oral allergies. An allergist can help you make this determination.

Store-bought almond milk is pasteurized, whereas homemade almond milk made from raw almonds is not. This spells trouble for those of us with an oral allergy to raw almonds. To neutralize the oral allergens, we’ll have to heat the almonds at some point in the process.

(Just to be clear, if you have a true almond or tree nut allergy, you should not consume any almond milk, including almond milk made with this recipe. Please consult an allergist if you’re unsure.)

Invention: the boil-soak approach

Here, I present an alternate approach, that has some of the benefits of both regular and blanched almond milk, without the time-consuming blanching process.

This technique involves boiling almonds in some water for a few minutes at the beginning of the soaking process. Heating almonds to boiling temperatures denatures the allergenic proteins, making them safe for those of us with oral allergies. This is much easier than boiling the almond milk later, since almond milk has to be heated very carefully.

Then, leave the almonds soaking in the water you boiled them in for up to a day, moving them to the refrigerator after they cool.

To make white almond milk, discard the soaking water (now a dark brown color) and use new water for the almond milk. If you’d rather preserve the almond skin nutrients, feel free to use this water for the almond milk, but measure it out so you use the right amount of water.

This approach is oral-allergy friendly, lets you make white almond milk easily, and produces incredible almond milk.

Recipe

You’ll need 1 cup of raw almonds, some water, a nut milk bag, something to boil and soak almonds in (a small pot works fine) and a blender.

Ahead of time (8 to 24 hours is great, but shorter is probably fine), put the almonds in enough water to cover them by an inch or so, and boil for a few minutes. Then let them sit in that water and soak, covered. Put the pot in the fridge once it’s cool if you’re going to soak longer than 8 hours or so.

1. Blend the soaked almonds with two cups of water.

2. Pour the almond mixture into a nut milk bag in a container.

I recommend using a pourable container like a large measuring cup, since we’ll be transferring liquid between this container and the container you’ll store the milk in.

Almond milk - 05Almond milk - 04Almond milk - 06

3. Squeeze!

Be gentle, especially at first, to avoid almond solids from squirting out. You can use more pressure as the contents become more solid. Don’t stress too much if some solids escape.

Almond milk - 07Almond milk - 08Almond milk - 09Almond milk - 10almond milk 20 - Version 2Almond milk - 13 cropped

You’ll be left with the first pressing of almond milk and almond pulp.

Don’t rinse the blender or wash out the nut milk bag, since we’ll be repeating this. Pour the almond milk into the container you’ll store it.

4. Again!

Return the pulp to the blender, and blend with another 2 cups of water, to get all the almond milk we can out of the pulp. Strain again, separating pulp from almond milk.

5. Final blend

Finally, set aside the pulp, and return some almond milk to the blender (which is still messy, with almond bits on the side). Using the most recently pressed 2 cups will work fine. Blend for a bit to incorporate almond bits.

This is also a good time to add any supplements you’ll be adding to the milk. (I’ll write more about fortifying plant-based milks later.)

Strain the milk one last time. This will be really easy, since the milk has very little pulp, and will mostly pour right through the bag.

6. Done!

Combine the almond milk from the two phases, and refrigerate.

You should have about a liter of milk. Depending on how thoroughly you blended, the milk may be very thick, and may benefit from adding extra water. I find it’s best to thin it to taste after making it.

Almond milk - 25almond milk 05a

Serve over cereal with fruit (berries, peaches, etc.) for a delicious snack / dessert.

Variations

You can make a really delicious milk by toasting the almonds first before making almond milk. This works fine from an oral allergy perspective, and adds a unique flavor to the milk. (It’s great with cookies, for instance!) However I can’t drink very much of that milk; it’s fairly rich, and is less versatile than regular almond milk, since it has a stronger flavor.

For a while I was adding a few toasted almonds with almond milk that I otherwise prepared normally, to give it a little stronger flavor, although most of the time I don’t bother these days. Experiment and see what works for you.

References

  1. LaBronx, Honey. “Episode 2 (Almond Milk).” Vegan Drag Queen Cooking Show. 28 Sep 2011. (Accessed 2 Nov 2014.)

  2. Chef, Vegan Black Metal. “Episode 1: Pad Thai.” Vegan Black Metal Chef. 9 May 2011. (Accessed 2 Nov 2014.)

    Not really relevant, I just think this something you should know about.